Feb 12, 2020
Kids Activities: 5 Fun Backyard Ideas to Try This Summer
We're in the middle of summer, the sun is shining and the kids are itching to head to the beach or the nearest playground - but sometimes you just need a day at home to get a few things done.
The key to keeping kids entertained during the summer months is to really make the most out of the outdoor areas around the house. If you've got a back garden, you've got the perfect opportunity to get into a few quick projects, quell the boredom and spark your kids' imaginations once again.
So, without further ado, here are our top 5 fun backyard activities to keep the kids out of trouble over summer. We hope you like them!
- Create your own mini-golf course
- Build your own outdoor theatre
- Make your own spray paint chalk
- DIY giant lawn twister
- Make your own slip-n-slide
1. How to create your own mini-golf course
This is an awesome DIY backyard mini golf course that requires very little materials to actually make, just a tonne of creativity when it comes to designing each hole. Plus, it'll keep the kids entertained for hours and they can help you out with designing the course.
Materials
- Wire coat hangers that you can easily halve and bend
- Cardboard
- Tape
- Golf clubs, hockey sticks, croquet sticks, or even small branches laying around the garden - whatever you have available to you will work
- Golf balls, one for each player
- Miscellaneous things you have lying around the house or garage you don't mind donating to your new mini-golf course (get creative!)
Method
- Begin by using a wire cutter or pliers to cut your coat hangers in half, and bend the straight wires into crescent shapes. These will be the formation of your 'holes' that the kids will be aiming for.
- Plan out where you'd like each hole to be placed on the back lawn. Usually there are 18 holds on a mini-golf course, but if you're spatially challenged, try planning out 9 and see how you go.
- Once you've decided where your holes are going to go, take each end of the bent wires and push it about 1-2 inches deep into the ground. You should end up with a clear archway for the ball to go through.
- We'd recommend (if you've got the materials) labelling each hole with a number, so the kids know where the game starts and finishes. Cut the cardboard into triangle shapes - enough for one per hole - and write in permanent marker big, clear numbers. You can attach your cardboard flags to sticks with sellotape and peg them in the ground next to the corresponding hole.
- Now it's time to get creative. Decorate each hole with a theme using things you can find around the house. We've seen some awesome ones, like half-closed books and even garden sprinklers as an obstacle!
- You're ready to play! Let the games begin.
2. How to build your own outdoor theatre
There's nothing more exciting as a child than getting together with your friends and putting on a performance for your family members. Plays, musicals, re-enacting their favourite TV-shows or even putting on a circus - there's really nothing better for the imagination than your very own theatre in your back yard.
Materials
- An old, large sheet (ideally the colour red, but it's no big deal if not) or red burlap material
- String/line
- Curtain hooks or pegs
Method
- Cut your piece of burlap or sheet into two halves (about 2.5m long, each) to make the curtains, and make a fold at the top of your curtain to thread the line through.
- Take your line and thread it underneath the fold you created on your two curtains.
- Take your pegs and use them to secure the curtain to the line, making sure that there's enough material to create a gap between the peg and the line for movement. The alternative, if you have them, is to fasten curtain hooks for the same effect.
- Tie each end of the line to a tree, pole or fence to secure your curtain.
- You've now got a stage! The kids can begin creating their next performance.
3. How to make your own spray paint chalk
Admittedly, this one does get a little messy, but the good news is that the kids will absolutely love taking their arts and crafts outdoors and it's a really easy clean up too.
Materials
- 1tsp washable tempura paint
- 1 cup of hot water
- 1/2 cup of corn starch
- Dish-washing liquid
- Spray/squirt bottle
Method
- Add your cornstarch to a cup of hot water and whisk until there are no lumps
- Add a teaspoon of tempura paint (you can order this online for pretty cheap, or buy it at craft stores, food colouring is a good alternative) and a squirt of dish-washing liquid, then mix well
- Pour your mixture into squirt bottles and shake it up. You're ready to go! The kids can now head outside and take their creativity to the pavement.
How to clean up spray paint chalk
All you've got to do is grab the hose and wash down the driveway. Everything should come off really easily with no scrubbing. As for the kids - since the chalk is in bottles, hopefully the mess will be minimised, but if not, the solution will come out of clothing in the wash.
4. DIY Giant lawn twister
Who doesn't love a game of Twister in the lounge? Someone who's played a giant version on their back lawn, of course! This is a really awesome way to take a family favourite to the great outdoors, and we think it'd be particularly good for a birthday party. Here's how to make it!
Materials
- A plastic bucket
- String
- Stakes
- A craft knife
- Marking spray paint (red, blue, yellow and green)
Method
- The first thing to do is to make a stencil so you can accurately spray paint each circle that makes up the Twister board. To do this, use a craft knife to cut a circle shape (7-inch diameter hole) in the bottom of your bucket.
- Next, use your string and stakes to layout a line string to help you to position the first row of circles. All you need to do is hammer two stakes or pegs into the ground and run a line between them.
- You're ready to spray! Line up your first circle and spray your marking paint into the bottom of the bucket. The bucket should catch the majority of the over-spray, but always be safe regardless and wear a mask.
- Rinse and repeat this process until you have four lines of coloured circles. Make sure to leave the paint to dry for a couple of hours before letting the kids play on their new Twister mat.
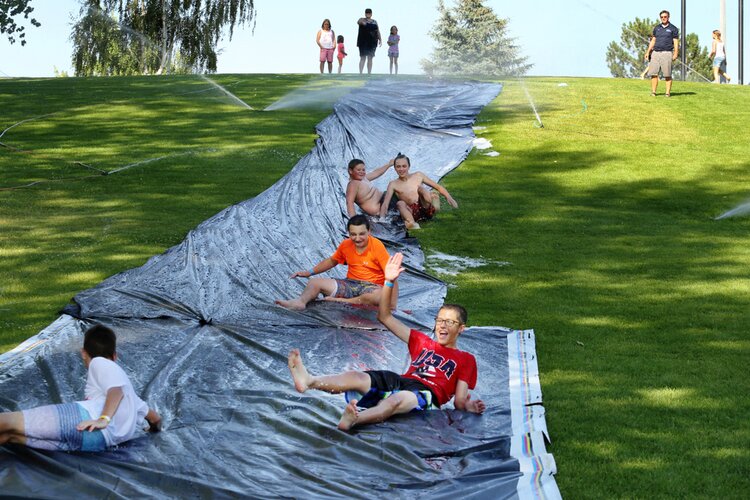
5. How to make your own slip-n-slide
When it's a hot day out side, the beach is a long drive away and you don't have the luxury of a backyard pool, the kids are going to want to find a way to cool off in some water.
The perfect solution to this problem is a slip-n-slide! You can buy these from any Warehouse-esque store, but in our experience, they're usually quite small and of poor quality, only lasting one or two uses before they tear.
Here's how to make your own slip-n-slide that's bigger, better and will last more than a few uses!
Materials
- Pool noodles (number depends on length of slide)
- Large roll of plastic
- Tent pegs
- Stick on Velcro or Command strips
Method
- Begin by rolling out your plastic and positioning it where you'd like to run your slide. Make sure that the area is cleared of obstacles and there's enough room at the end of slide to ensure it's safe.
- Position the pool noodles along the outside edges of your plastic. These are going to act as safety barriers for the kids, as well as a funnel for the water that will trickle down the slide.
- Next, roll pool noodles into the plastic (so they're covered) and stick the plastic down with your Velcro or Command strips.
- Use your tent pegs to peg your water slide into the ground at each end. These will also help ensure that your noodles stay firmly inside your plastic sheeting. Make sure to use as few tent pegs as possible and to position them strategically and ensure that no sharp end is sticking out of the ground.
- Run a hose to the top of your slide and turn the water on. For extra slipperiness you can add a little bubble bath!
- Your slip-n-slide is ready to go!
Had a little too much fun in the garden and need help cleaning up?
We know how tough it can be to keep the dirt and stains that go hand-in-hand with a brilliant day out in the sunshine from making its way inside. If that happens - don't worry! We've got almost every kind of stain covered in our Stain Guide. You can download it for FREE, below.